Search This Blog

Tuesday, May 28, 2013

Happy Memorial Day! and Summer Shades Last week of School Project (updated)

Hope everyone had a wonderful Memorial Day weekend!  It was a bit windy here, but we were blown away at how much fun we had on the beach!  I love three day weekends because then you get to have a four day week!! It's like the gift that keeps on giving! 
Today we are making Summer Shades with a picture in the lens that tells a story about what we will be doing over summer break! The kids have been very creative with this today and I love being able to wear my example when the kids enter the room! 
Friday we began painting our rose sculptures. We had to paint with acrylic since there is not enough time left for glaze. I was very pleased with how the Sargent Art acrylic Glitter Glaze looks on the roses! We also put Mod Podge on them to make them extra shiny! 


A student made this for me today! It totally made me cry. So simple, so beautiful.  It is going in a frame in my house. It makes this all worth it to know that I have inspired someone. Thank you, Emmy!


My kids made peacocks this weekend with all their cousins! There is nothing more fun than shaving cream play in the summer time!


If you have not done this before, go to the store and get some food coloring or liquid watercolors and try it. The way the paint looks on the shaving cream is SO COOL!!!


Thursday, May 23, 2013

Best Project Ever!

So with the end of the school year upon us, I needed a good simple lesson, that would be fun and EASY! This project is good for kinder through fifth! YES they ALL love this project! I told them it is something they can do at home this summer too! We have had more fun this week doing this, I think they would be happy doing it next week too! 

All you need is coffee filters, a spray bottle, markers, and some glue
 First fold the coffee filter like this


 Then spray about 3-4 times on the FRONT and the BACK and squish it flat and smooth

Then use markers to make a creative design with DOTS!
Every dot has to be done on the front AND THE BACK.
 Then CAREFULLY open to reveal the gorgeous design!!!! The best thing is that the whole project only takes one class period!


I let each student make two circle designs


 Then glue onto a piece of paper and create something!! The posssibilities of "circle things" is endless! I have LOVED seeing everyone's creative ideas!!!

Monster Truck
 Ferris Wheel
 Super hot soccer ball
 Pizza!
 Flowers
 Headphones!
 Stained glass window on a church wall!
 Crystal Ball!!
 Ice Cream Cone!
 Glasses!
 Another Monster Truck (they were popular)


 Gumball Machines!

Friday, May 17, 2013

Shaving Cream Fun Peacocks!


This week, second graders are finishing their marbleized peacock paintings. It has been so fun to watch their reactions to the shaving cream which is a HUGE crowd pleaser! We made the heads the first week with markers and painted the middle with sparkly water. The eyes and beaks were colored with oil pastels.

Here is a link to the marbleizing directions HERE


 We made the head the first week and the spots the second week 


 they used black crayons to draw the spots, then colored them with markers. They used sparkly water to paint the markers. I have been putting glitter glaze or glitter paint in the paint water, when we paint markers. The kids LOVE being surprised by the sparkles

 SPARKLY 


I have had many people ask about the liquid watercolor. Here is a quick link to the brand that I use if you want to get some. They are AWESOME! 

Thursday, May 9, 2013

Bull Dog Draw-a-Long

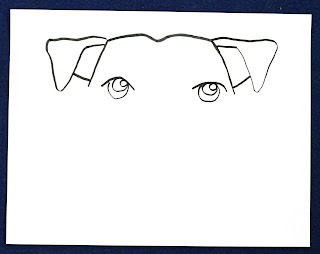
A few posts back I said I was going to write out the script for the bull dog Draw-a-long. These are the steps I use when doing it with the younger grades. As you can see they are very precise, which is important for every learner to be able to follow along and be successful. This lesson builds confidence because they are so EXCITED when they finished to see a dog that looks so realistic. The open ended background allows for SO much creativity to happen. This is a great drawing exercise for any grade level k-5th! 

Get your pen ready and HAVE FUN! 
I would LOOOOVEEEEEE to see your finished bulldogs to add to the bottom of this post!! Send them to 
www.natty241@hotmail.com 
Be sure to color ALL of your background!  :-) 


1. Begin with a line at the top with a little wrinkle. IT should be longer than your finger 


                    2. Then draw two diagonal lines about the same length as your finger


 3. Then draw two lines at the top. One long and one short


 4. Then connect the lines with a letter "V" and draw a small line from the head to the "V"


5. The begin the eyes close to the BOTTOM of the ears. NOT inside the forehead. First Draw a tiny rainbow, Papa circle (iris), Mama circle(pupil), and baby circle (reflection of light).


 6. shade in the mama circle (pupil) black and draw the "smiley" line under the eye


 7. draw a wrinkle like an upside down "T" right above the eyes (not under the eyes) and make a huge rainbow that touches BOTH eyes AND the wrinkle.


 8. Draw a "follow the leader line" right under the rainbow (very close to the rainbow)for a wrinkle. Then make the nose as big as the eye, starting with a sideways curly letter "C"

 9. draw the bottom of the nose like a letter "V" and a tiny line in the middle. 


10. Then draw a tiny line under the nose. Then draw a tiny letter "A" 


11. then make two tiny tiny rainbows under the "A"


12. Then make the "A" bigger and draw a "smiley" line for the bottom of the tongue


 13. now draw a line from the "A" downward  and back up towards his eye, and make a little smiley line.


 14. draw a "follow the leader line" from one smiley under the tongue and back to the other smiley to make the inside of his mouth


 15. now fill it in black and the tiny part of the letter "A". Also add the wrinkles above the eyes and on the forehead


 16. Now draw the outside of his face beginning back up at the original diagonal line we started with, all the way down, following the leader, under his lips, make a slight dip for his chin and back up the other side to the other diagonal line


17. Now make a dash line all the way around his neck


18. draw the spikes beginning in the middle and coming out through the open dashes


 19. now draw a line from half way up his head all the way down to the bottom of the paper on both sides for his body

 20. YAY You finished!! Now you can color him and create an interesting background using something you have learned this year! (fun letters, puzzles, one point perspective, checker boards, op art,fun fonts, graffiti, etc)

Total Pageviews